- HOME
- PRODUCTS
- NEWS
- ABOUT US
- Download
- CONTACT US
Views: 0 Author: Site Editor Publish Time: 2024-03-29 Origin: Site
A CNC milling machine is a computerized numerical control machine where the tool path is controlled by a computer. It is used to machine a variety of materials including wood, aluminum, stone, plastics, composites and foam. CNC routers use a 3-axis CNC cutterhead to remove material from the blank to shape the part. The 3-axis means that the CNC cutter can be moved simultaneously in three directions, X, Y and Z. The 3-axis cutter head can be used to remove material from the blank and shape the part.

Let's get started with basic skills for beginners using a CNC milling machine.
Step 1. Start the CNC milling machine
Before we begin, we need to plug in a few components:
1. Quickly power up the CNC control box near the wall with the rotary switch.
2. Then press the green start button to activate the remote control.
3. Turn on the dust collector (remember to check the dust bag).
4. Press the white button to activate the vacuum table.
Step 2: Selecting End Mills - Introduction
There are many different inserts to choose from when working on a project on a CNC router. The only router bits we can use are called end mills and they come in many different shapes and sizes. We will give a brief overview of end mills here. We want you to fully understand the following before you complete this course and start your first project:
1. number of flutes.
2. End mill shapes: Flat bits vs. Ball bits vs. V-shaped bits.
3. Size.
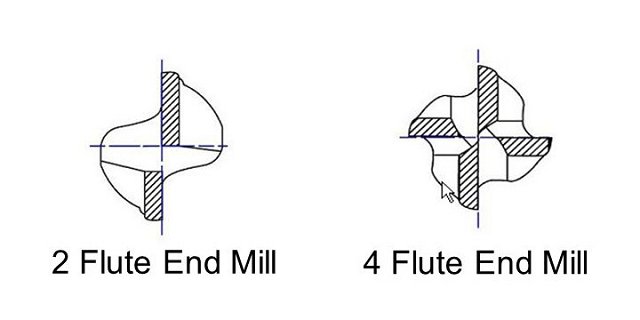
Take a look at the first picture in this step-by-step guide and see if you can notice the difference between the two bits shown. If you can't tell, the CNC bit on the right has four edges while the bit on the left has only two. These edges are called sharpening edges and each has its own role in a CNC program. What's the difference between them? We like to describe the difference between a four-flute end mill and a two-flute end mill as a similar difference between a miter saw and a hacksaw. A miter saw has fewer and larger teeth than a hacksaw, making it ideal for cutting softer materials like wood. Hacksaws have finer teeth and are more ideal for sawing metal pipes and other hard materials. When looking for the right end mill for your project, keep in mind that four-flute end mills are good for harder materials (such as aluminum, mahogany, plastic, teak, etc.) and two-flute end mills are good for softer materials (such as MDF, plywood, cedar, etc.).
Step 4: Selecting an End Mill - Shape
In addition to the number of flutes, end mills come in a variety of different shapes.
Flat (a.k.a. End Mills): Note the flat profile of the end of the shaft. This flat shape is ideal for cutting clean contoured cuts, slotting or drilling.
BALL NOSE: Note the domed top at the end of the cutting edge. This shape makes this insert suitable for 3D surface machining only. This insert is not suitable for contour cutting.
V-Nose: Note the pointed end of the blade. This shape of blade is ideal for engraving. Engraving is especially easy with this type of blade.
MYSTERY CUTTERBITS: Perhaps while looking for cutterheads in the "End Mills" cabinet, you will find some interesting cutterheads that are not listed here. No matter how interesting that CNC cutter head looks or how well it fits your job.
Do not use an unclassified cutter head without consulting your shop manager or CNC milling machine guru.
Step 5: Replacing Inserts or End Mills
If the end mill you need is already in the CNC machine. Then simply follow the instructions below to check the tightness:
1. Place the remote control on the stand, making sure that the spindle start button is not pressed during this process.
2. Remove the two wrenches from the CNC milling machine table and carefully loosen the collet from the spindle, paying attention to the knuckles.
3. first remove the cutterhead from the collet and place the old end mill in the toolbox before replacing these items.
4. place the new end mill in the collet at a height high enough to hold most of the shank - when correctly placed, the new end mill can (but does not have to) extend out the back of the collet. For smaller end mills, push the end mill into the collet about 2 mm from the start of the helix.
5. Screw the nut/collet/end mill back into the spindle - do not use excessive force.
Step 6: Place the workpiece on the table
- When you are ready to cut the sheet, it is important to check all 4 vacuum zones (underneath the MDF) and if the zones have rubber strips around the edges, make sure that the strength of the vacuum, which determines how much air pressure is actually holding down the workpiece.
The less vacuum, the less pressure.
- If you are using a small sheet and it doesn't fill the entire vacuum zone, you can use a plastic stopper and place shorter rubber strips in the gaps to narrow the vacuum zone.
- Then place the MDF board back on the vacuum table, ready to place your own board on top of it, select the vacuum zone you want to use and press the white button to start the vacuum.
Step 7: Setting the X and Y Axes
You must now set each axis to zero. The tip of the router bit should be located behind the left side of the material surface. When satisfied with the new zero, press [ XY=0 ] and [ OK ].
Step 8: Setting the Z-Axis
There are two different ways to set the Z-axis:
There are two difference ways you can set up the Z axis:
Paper Method
Find a piece of nomal A4 paper and put it between the part and the bit, bring the Z carefully down to the paper and when you are 5mm from the top shift to stepper movement by pressing [ ~ ] and you can now safely move closer so the tip just touch the surface of the paper when you move it between. Then press [ Shift ] + [ XY=0] and [ OK ] and the zero is exactly 0.100mm over the surface now.
Toolsensor Method
Place the toolsensor under the router bit on the top of the part you wil cut in, and bring the tip of the bit down, so its 8-10mm abort the sensor plate and press [ Shift ] + [ ~ ] and the tool will automatically move down and set the zero point for you.
*IMPORTANT
When changing bits between milling operations it will be necessary to reset the z zero coordinate. Do not reset the X, Y coordinates.
You are now ready to load your designed file from CAD/CAM software into the CNC controller box by using a flashdrive.
Instructions:
• Put flashdrive into the reader.
• Wait for the read USB message.
• Press [ OK ].
• Find you file by scrolling ▲▼◄► the usb library.
• Press [ OK ] to upload and [ 1 ] to confirm.
• Put on your ear protection and googles.
• Now you can press start [ ► ].
• Wear eye and ear protection at all times. The shop will supply you with both goggles and earplugs.
• Keep the table clean and free of tools and loose materials.
• Never leave the router running unattended. If you need to leave, please ask someone to watch it for you or pause the job.
• Never lean on the table or rest hands or feet on the machine while it is running.
• Do not attempt to make adjustments or reposition the material while the machine is running.
• Use the dust collector or vacuum while the CNC machine is working.